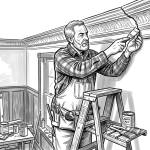
How to repair crown molding
To repair crown molding like the professional in the illustration, follow these three essential steps:
Prepare the Surface
Before applying any new materials, it is crucial to prepare the damaged area for a lasting repair. Begin by using a utility knife to carefully score and remove any old, cracked caulk or loose paint from the molding and the surrounding wall or ceiling. Once the old debris is cleared, wipe the area with a damp cloth or a sponge to remove dust and dirt, ensuring the new filler will adhere properly. For larger cracks or where the molding has separated, you can apply painter’s tape about 1/16th of an inch from the edges to protect the surrounding surfaces and ensure a clean repair line.
Fill Gaps and Cracks
Once the area is clean and dry, select a high-quality, paintable caulk or wood filler depending on the size and type of the damage. For thin cracks or gaps where the molding meets the wall, use a caulk gun to apply a steady bead of flexible, "extreme stretch" caulk that can accommodate future home movement. Use a damp finger or a specialized caulking tool to smooth the bead immediately after application, ensuring it fills the void completely. For deeper holes or gaps between molding pieces, apply a non-shrinking spackle or wood filler in layers, allowing each to dry before adding more if necessary to prevent future shrinking.
Finish and Paint
After the filler or caulk has dried completely—typically 15 to 30 minutes for quick-dry formulas—lightly sand any spackled or wood-filled areas with 220-grit sandpaper to achieve a smooth, flush surface. Wipe away any new sanding dust with a tack cloth before proceeding to the final finish. Apply a high-quality primer to the repaired areas to ensure the paint adheres evenly and doesn't fade over time. Finally, apply one or two coats of semi-gloss paint that matches the existing trim, using long, even brush strokes to blend the repair seamlessly into the rest of the molding.