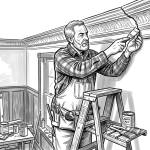
Crown molding installation
Installing crown molding is a sophisticated project that transforms a room by creating a seamless transition between the walls and the ceiling.
The process begins with precise measurements and the selection of the right material, such as lightweight polyurethane for ease of handling or classic solid wood for a high-end finish. The most critical challenge lies in the compound miter cuts, where the molding must be cut at specific angles to fit snugly into corners. Because most walls are not perfectly square, a professional approach often involves coped joints, where one piece is hand-scribed to fit the profile of the adjoining piece, ensuring a gap-free connection that remains tight even as the house naturally settles.
Once the pieces are cut to fit, the installation requires a steady hand and the right fastening tools, typically a pneumatic finish nailer with 2-inch nails. It is essential to nail into the wall studs and ceiling joists rather than just the drywall to ensure the molding stays secure over time. After the molding is pinned in place, the "magic" happens during the finishing stage: filling nail holes with wood putty and applying a continuous bead of caulk along the top and bottom edges. This hides any slight wall imperfections and creates a crisp, built-in look. A final coat of high-quality semi-gloss paint then highlights the elegant contours, adding a sense of architectural depth and value to the home.